
Silhouette Fabric Applique Tutorial

You can buy the Silhouette fabric interfacing (sewable or clean cut) or you can buy HeatnBond (Sew or ultra hold).
The price difference is $5.00 for the same amount of interfacing (17” X 36”).
$7.99Screenshot2011-03-13at9.06.46PM-2011-03-15-05-00.png VS. Screenshot2011-03-13at5.58.34PM-2011-03-15-05-00.png$2.47
✄✄✄✄✄✄✄✄✄✄✄✄✄✄✄✄✄✄✄✄✄✄✄✄✄✄✄✄✄✄✄✄✄✄✄✄✄✄
pic%283%29-2011-03-15-05-00.jpg
You can see what I chose.
Step 1: Cut your fabric and interfacing the same size. Make sure it will fit your adhesive mat. It works best on the thicker mat.
(This is the thin mat, I need to purchase a new thick media cutting mat. The green mat is the one you should use.)
✄✄✄✄✄✄✄✄✄✄✄✄✄✄✄✄✄✄✄✄✄✄✄✄✄✄✄✄✄✄✄✄✄✄✄✄✄✄
pic%284%29-2011-03-15-05-00.jpg
Step 2: Iron the fabric to the interfacing and peel away the paper side.
✄✄✄✄✄✄✄✄✄✄✄✄✄✄✄✄✄✄✄✄✄✄✄✄✄✄✄✄✄✄✄✄✄✄✄✄✄✄
pic%285%29-2011-03-15-05-00.jpg
Step 3: Place the fabric right side up on your adhesive mat. You want to use the thickest adhesive mat.
✄✄✄✄✄✄✄✄✄✄✄✄✄✄✄✄✄✄✄✄✄✄✄✄✄✄✄✄✄✄✄✄✄✄✄✄✄✄
Screenshot2011-03-13at5.09.44PM-2011-03-15-05-00.png
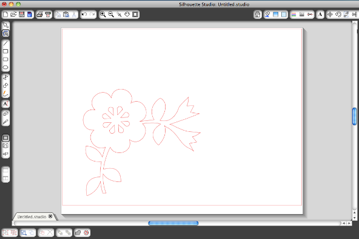
Step 4: Go to your computer, set up your applique design. Click send to Silhouette.
✄✄✄✄✄✄✄✄✄✄✄✄✄✄✄✄✄✄✄✄✄✄✄✄✄✄✄✄✄✄✄✄✄✄✄✄✄✄
Screenshot2011-03-13at6.05.11PM-2011-03-15-05-00.png
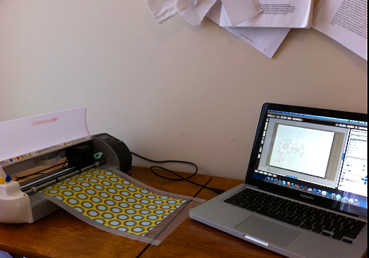
Step 5: Send the cutting job to your Silhouette.
Use the pink cap, set the speed to 3-5 and the cutting thickness to 25-30.
You might want to double cut, depending on the fabric you are using.
✄✄✄✄✄✄✄✄✄✄✄✄✄✄✄✄✄✄✄✄✄✄✄✄✄✄✄✄✄✄✄✄✄✄✄✄✄✄
pic%286%29-2011-03-15-05-00.jpg
Step 6: Peel away the excess and then your applique.
✄✄✄✄✄✄✄✄✄✄✄✄✄✄✄✄✄✄✄✄✄✄✄✄✄✄✄✄✄✄✄✄✄✄✄✄✄✄
pic%287%29-2011-03-15-05-00.jpg
Step 7: Use your beautiful applique!
Happy Sewing!

Comments

Jenni said…
This is so great! When they came out with the interfacing I figured that meant there were other products already available that would do the same thing I just wasn't sure what it was. Thanks for sharing the knowledge.
April said…
I have been using Heat-N-Bond since before they said the Silhouette could cut fabric! :) I do love my machine though!
Katelyn said…
So you say to use the ultra hold...I own the heatnbond lite. Have you tried that? Would it work? Thanks so much for sharing!! I have been afraid to use anything but the silhouette brand with my machine.
Unknown said…
This is awesome, im so excited to try this... one question, does this have to be sewn around the edges (im new to all of this) lol
MrsT said…
Yes, or the fabric will fray along the edges.

Popular posts from this blog

Fun in the Sun Mermaid Tutorial

Sewing Materials: 1/4 yard of Lycra or  5T or larger old swimsuit Thread Stretch Needle (helps) Sewing Machine and Sewing Notions Print the PDF patterns pieces out and tape them together. ✄✄✄✄✄✄✄✄✄✄✄ ✄✄✄✄ ✄✄ Step 1: Cutting Layout-  Place the templates over the fabric and cut. ✄✄✄✄✄✄✄✄✄✄✄ ✄✄✄✄ ✄✄ Step 2:   Fold the top edges of the mermaid tail and sew across. ✄✄✄✄✄✄✄✄✄✄✄ ✄✄✄✄ ✄✄ Step 3: Place the mermaid tale pieces right sides together. Sew around the mermaid tail using the stretch stitch, it looks like a bolt of lighting. ✄✄✄✄✄✄✄✄✄✄✄ ✄✄✄✄ ✄✄ Step 4: Flip the mermaid tail right side out using a chopstick.   Option: You can add Poly-fil to make the end of the tale puffy.   Set aside. ✄✄✄✄✄✄✄✄✄✄✄ ✄✄✄✄ ✄✄ Bodice   Step 1: Cut a bodice measuring  4.5” X1.5” or use template. ✄✄✄✄✄✄✄✄✄✄✄ ✄✄✄✄ ✄✄ Step 2: Fold the bodice right sides together and sew the  short ends making a loop. Use the edge of the presser foot for your seam a

How to Line an A-Line Skirt Tutorial

 After you find an A-line skirt pattern , I am using  One Yard Wonders 101  template . Make a muslin of your skirt! It only takes a few minutes to make a muslin version. Just baste stitch the side seams and make adjustments for your hips. Once your template is right you can make all the skirts your heart desires, so it is important to get the perfect fit first. Now we are ready to cut the "good" fabric and sew! ---------------------------------- ---------------------------------- ---------------------------------- ---------------------------------- Flip the skirt right side out and put it on!! You are done!! It is super easy and your new skirt will look store made.  Plus there is no hand stitching the lining to the main fabric. If you have any questions please comment below or email me at leah.sewspoiled@gmail.com .  WooHooo!! A-Line Skirt Pattern Finds

Sweet Coin Purse Tutorial for Teacher Gifts

This time of year is so special to me because I get to show my gratitude for all of the hard work that goes into teaching my daughters. I love to make handmade gifts and this year is no exception. Since money does not grow on trees around here, I looked at my stash (I keep my scraps in hat boxes ) and tried to see what I had a lot of; small zippers, trims, Peltex strips ( from making iPad cases ), fabric scraps and some hardware for key fobs. So I set to work.  Materials: Plastic multipurpose 5" Zipper  Fabric Scraps Lightweight interfacing 808 Pellon Trims (We clipped  key fobs  with 1.5" swivel hooks onto our coin purses . There are tons of tutorials on making key fobs .) Step 1: Print out the Coin Purse Template  PDF.  Cut 2 main fabric, cut 2 lining and 2 interfacing using the template.  Optional: Cut a 2"X2" square of your choice main fabric or lining. This strip of fabric is used to clip a key fob to your coin purse later. We used a 1.5